
如何打造高效 TCP Server 上集 - 單台 Server 如何同時處理上萬連線?
從 C10K 問題到 epoll,深入 Nginx、Redis 與 Rust Tokio 的高效能秘密

Nginx 是轉發請求的高效代理伺服器,Redis 則是快取資料庫的王者,它們在單次請求的處理速度都極快,因為幾乎完全避開了造成瓶頸的硬碟 I/O。
但如果處理瞬間大量請求呢?讓我們深入探究 Nginx & Redis 如何處理瞬間大流量!
瞬間湧入上萬個 Client 請求,即便沒有硬碟瓶頸,Server 也會爆嗎?
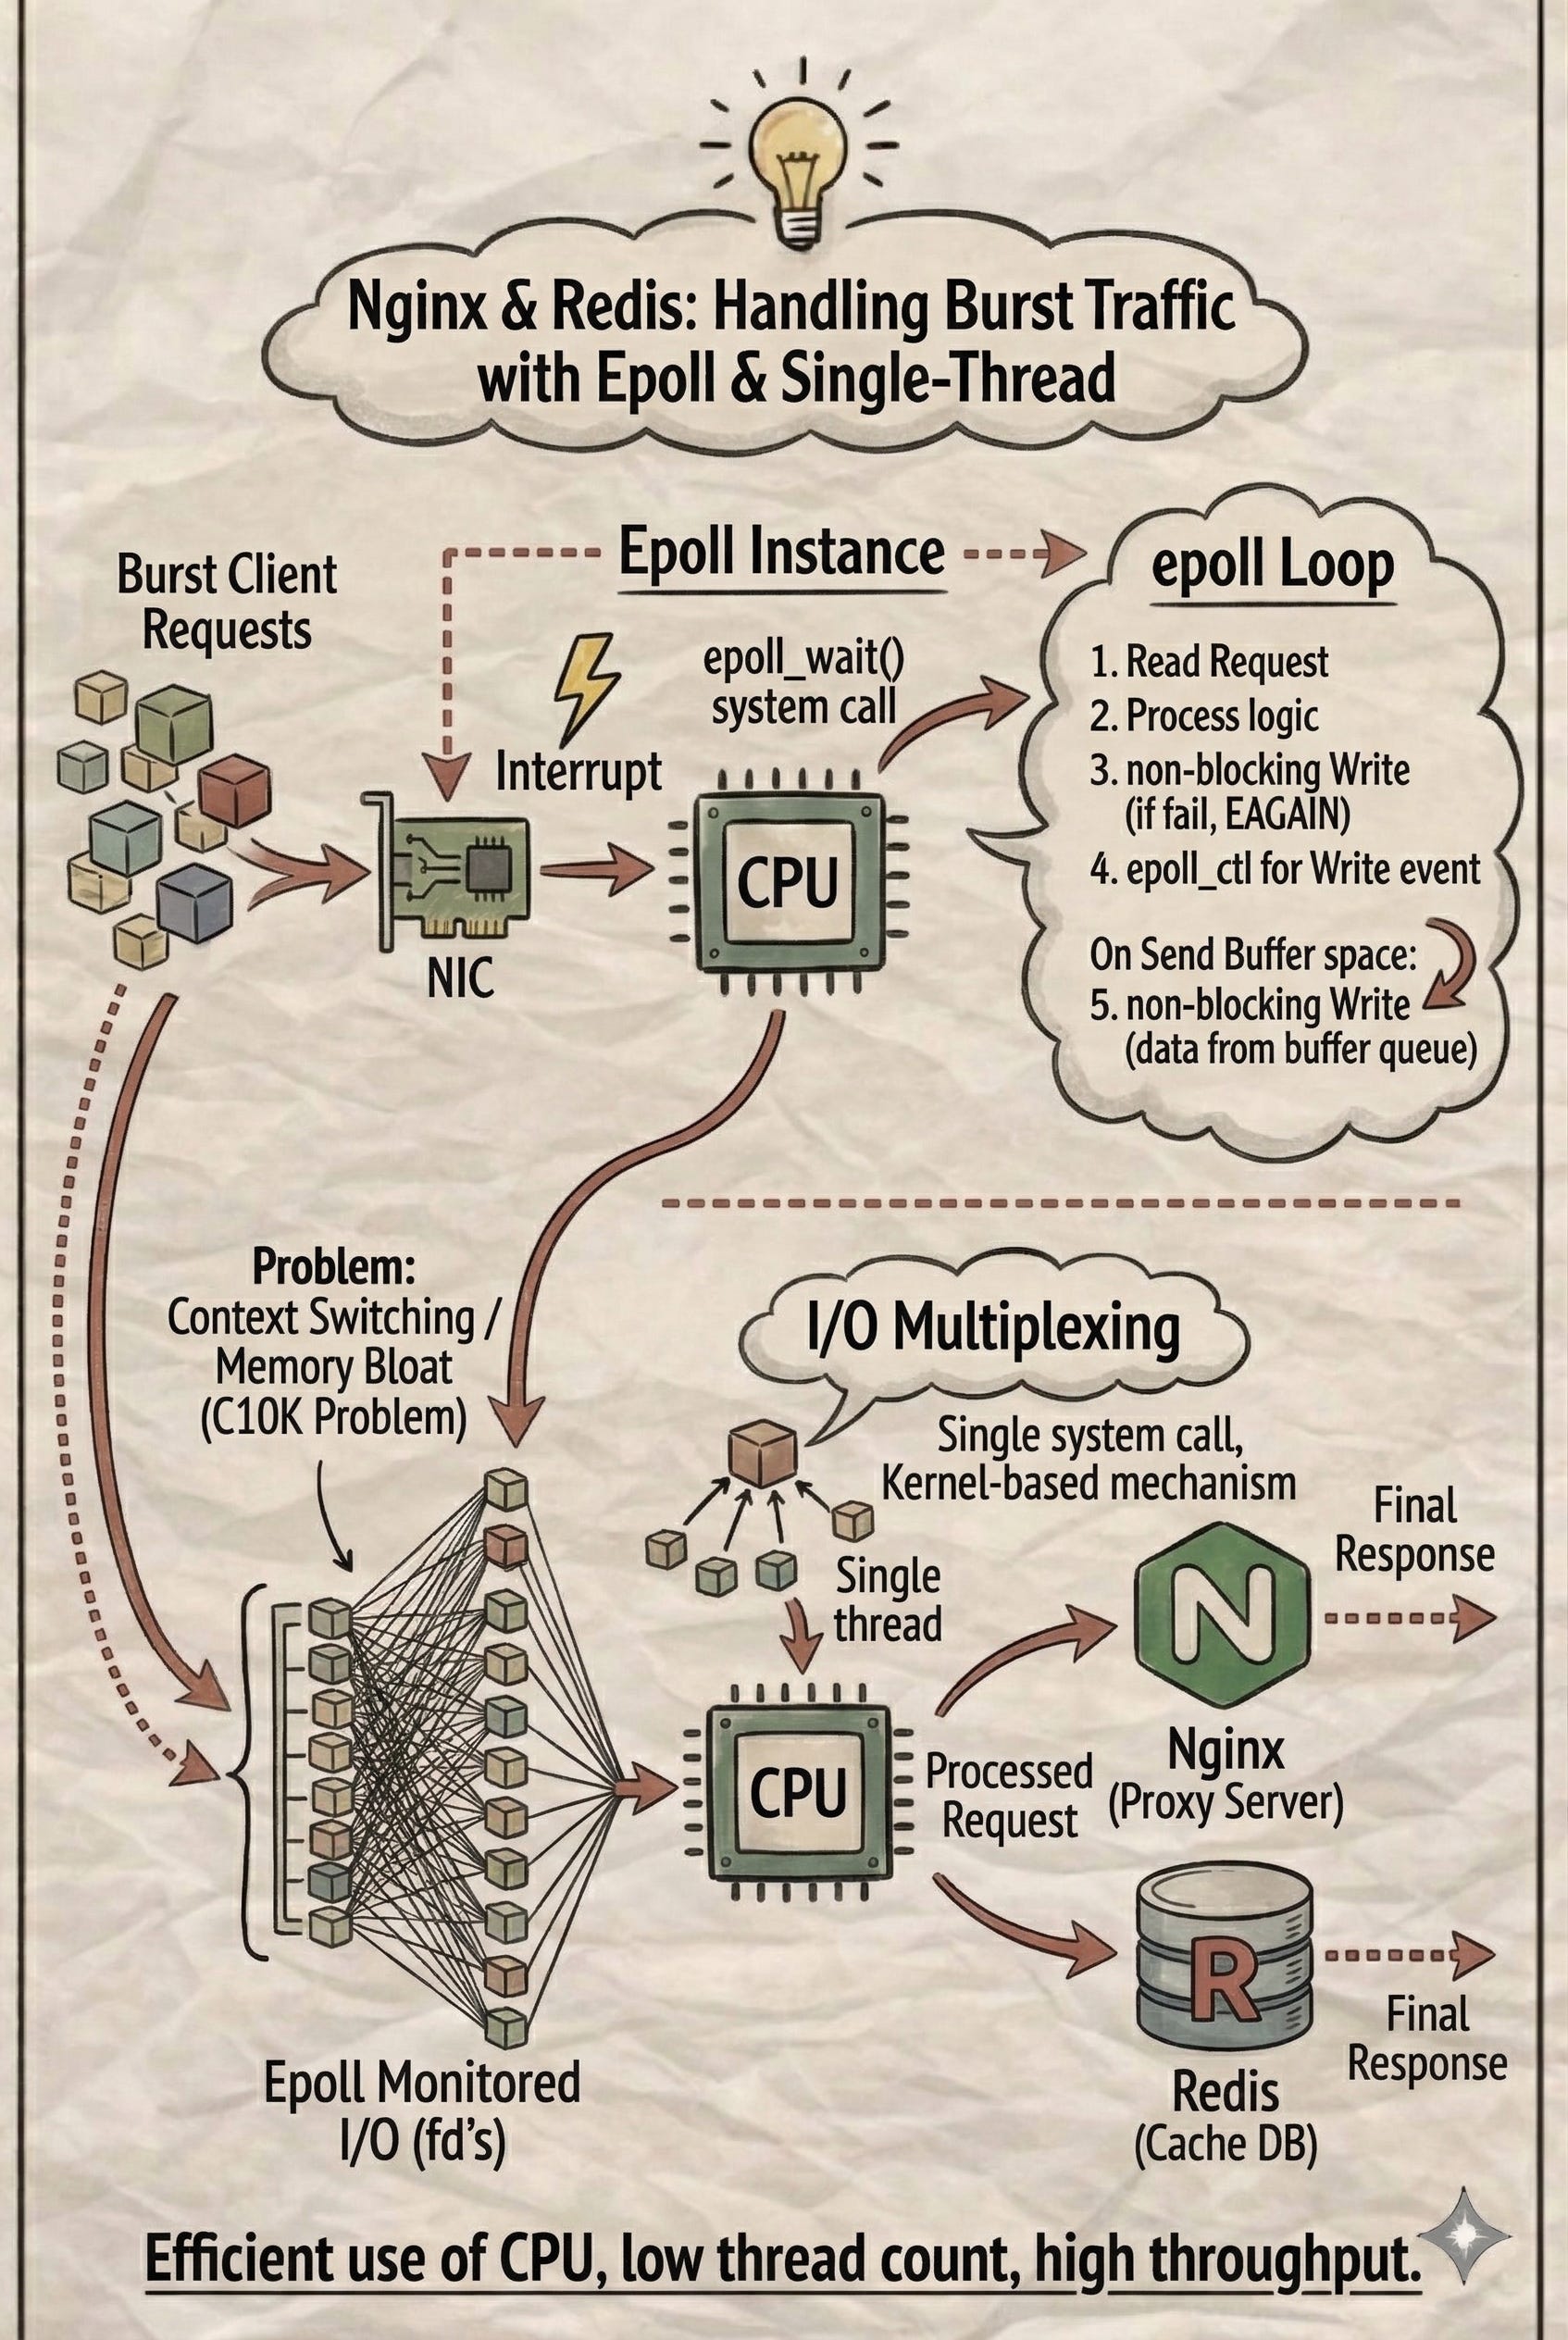
瞬間湧入大量請求時,Server 要建立大量 TCP 連線接收請求回傳結果,由於每條 TCP 連線在傳輸過程中不能互卡,因此直覺做法是「一條連線綁一個 Thread」來處理請求並傳送結果,此時大量連線建立大量的 Thread,造成 CPU 頻繁的 Context Switch 以及大量的記憶體消耗,Server 資源不夠就爆了。
而這也衍生經典的 C10K 問題,如何讓單台 Server 同時處理 1 萬個連線請求?
當 client 往 server 送請求時,TCP server 的 accept system call 會建立一條 TCP Connection,並透過 read() & write() system call 讀寫資料,而 TCP Connection 又分 Block I/O 跟 Non-Blocking I/O。
Blocking I/O - Connection Per Thread 模式
Blocking I/O 執行 read() 時,若沒資料可讀會卡住,直到有資料才 return,同理執行 write() 時,如果 kernel write buffer 寫滿了,write() 會卡住,直到 kernel buffer 有空間後才會 return。
因此多個 Blocking I/O 不能共用 Thread,因為當第一個連線的 read() 因為沒有資料而卡住時,會導致後面連線即便有資料也處理不到,所以 Blocking I/O 必須一個連線搭配一個 Thread 去執行各自的 read loop。
Non-Blocking I/O - One Thread Polling 模式
而 Non-Blocking I/O 執行 read() & write() 時,沒資料或不可寫會直接 return error,一個 Thread 可處理多個 Non-Blocking I/O,前一個連線沒資料 return error 後往下一個連線處理,不卡住任何人。
但 Non-Blocking I/O 實現 read loop 時,必須不斷詢問所有 TCP connection 確認有誰有資料可讀,每次 read() 都是一個 system call,雖減少了 Thread 數量,但每次都要詢問所有連線,會消耗大量 CPU,且若大量連線都沒資料還卻反覆詢問,等於做了許多無效的 system call。

單線程如何高效地管理多個 Non-Blocking I/O ?
使用 Non-Blocking 看似要輪詢,但其實 kernel 在管理多個 TCP 連線時,不透過輪詢,而是硬體中斷訊號,例如 NIC (網卡) 收到網路封包後,會向 CPU 發送中斷訊號,此時 CPU 會停下手邊工作,告訴 Kernel 有緊急事件,隨後 Kernel 會把封包資料讀到記憶體中並通知對應的 user space process。
竟然 Kernel 可透過中斷訊號主動通知,那麼 user space process 就可讓 Kernel 一次監聽多個 TCP 連線,等其中一個連線有資料可讀時在把 process 喚醒,也就是透過一次 Blocking 操作監聽多個 Non-Blocking I/O,避免 user space process 要不斷送出無效的 read(),而用一個 thread 透過單一 system call 同時監聽多條 I/O 連線的機制,稱為 I/O 多工(I/O Multiplexing)。
Kernel 的 I/O 多工(I/O Multiplexing)技術 - select & poll
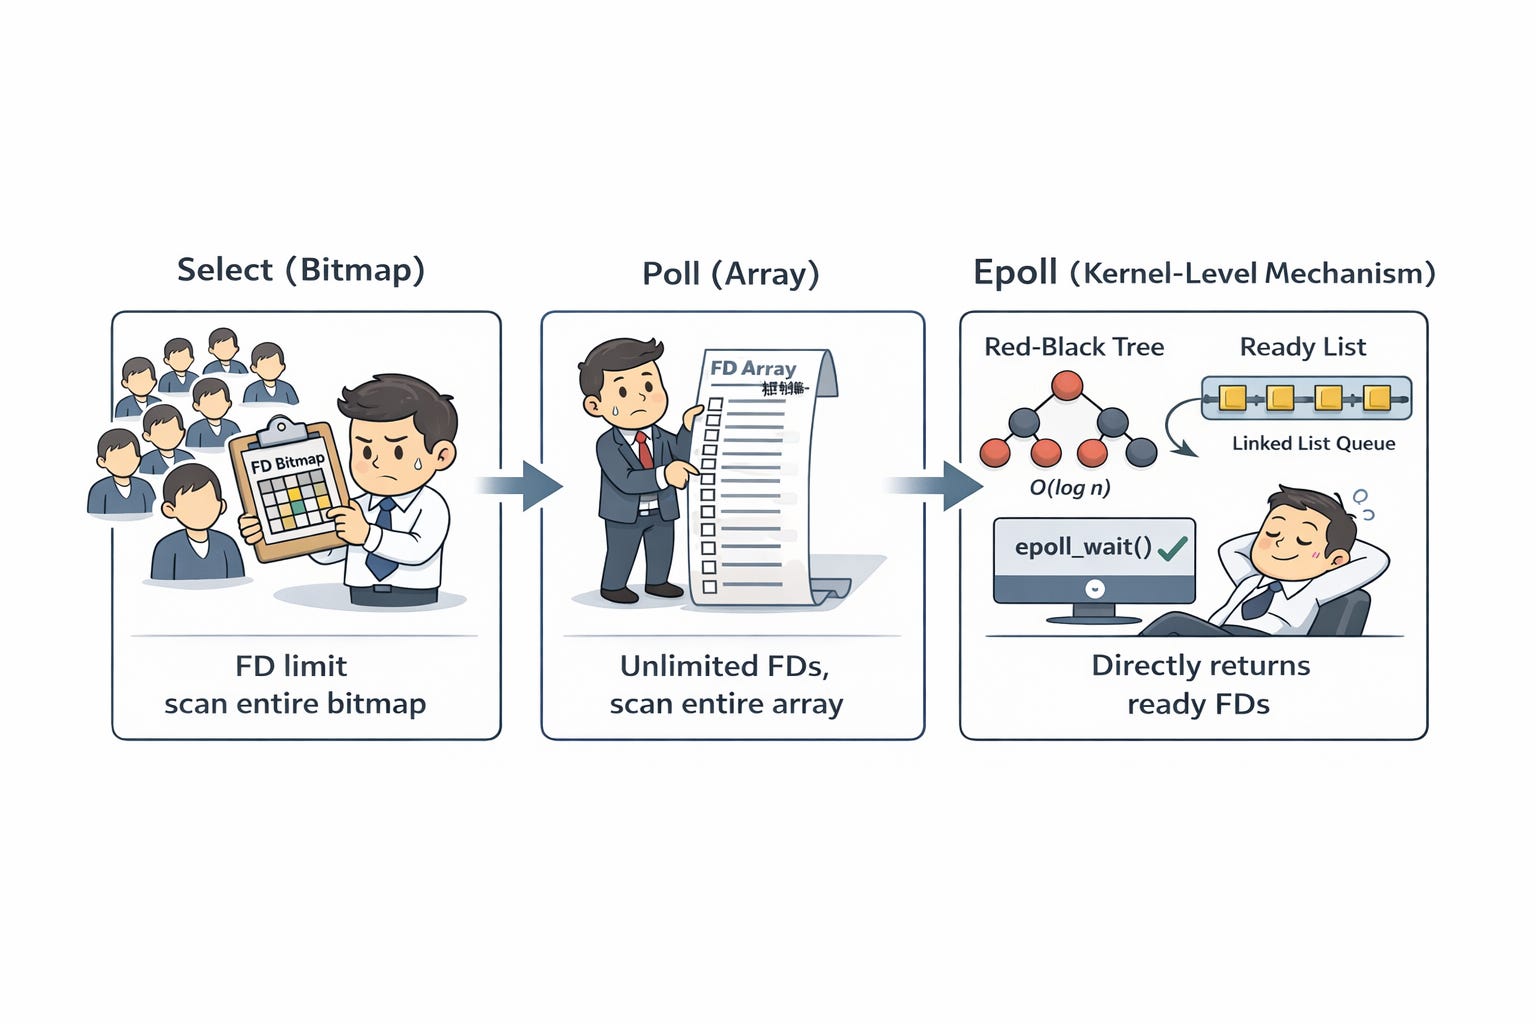
例如早期 Kernel 提供 select system call,用 bitmap 結構管理多個 Non-Blocking I/O 傳入 select,Kernel 會將 process 阻塞,直到任一連線有資料到達後喚醒,並覆寫 bitmap 內容,把有資料的連線更新進去,隨後被喚醒的 process 要 scan bitmap 內容找到對應的 TCP 連線讀資料。
select 缺點是 bitmap 結構限制了監聽 TCP 最大數量,因此 poll system call 則將 bitmap 結構換成 array,但是 select & poll 仍有共同的缺點:
用 user space 資料結構管理需要監聽的 TCP 連線,要將該資料結構從 user space 複製到 kernel space
process 被喚醒後,即便只有一條連線可讀仍要 scan 整個結構 (bitmap or array) 才能找到該連線
Kernel 如何設計出更好的 I/O 多工機制?
epoll 是 kernel 內部管理多條 non-blocking I/O 的結構,因此不用在 user space 另外建立 bitmap or array 結構,透過 epoll_create() system call,kernel 會建立一顆紅黑樹跟 double linked list,並用 epoll_ctl() system call 將 TCP 連線放入紅黑樹讓 kernel 管理,紅黑樹新增/刪除連線的時間複雜度為 O(log n),比陣列更適合頻繁增減連線的場景。
user space process 執行 epoll_wait() system call,kernel 會阻塞該 process,當收到中斷訊號並處理完封包後,會透過事先註冊的 callback 將對應連線放入 double linked list,隨後喚醒 process,process 直接從 double linked list 中獲取可讀的連線,不用 scan 整個結構。
且有 double linked list 結構當作 queue,epoll 能實現兩種觸發模式:
Level-Triggered:當連線還有資料可讀,epoll_wait() 就會回傳,也就是說沒把所有資料讀完前,不會從 double linked list 中移除。
Edge-Triggered:狀態變化時觸發,當有新資料到時,放進 double linked list,epoll_wait() 一回傳就移除,直到下次有新資料抵達才在放進去。
Redis & Nginx 如何使用 Epoll?
使用 epoll 時,常見模式是用一個 thread 執行 epoll_wait(),避免多線程同時處理相同 TCP connection 導致讀取資料被截斷,因此單線程的 epoll loop 執行過程就需要避免任何可能的阻塞。
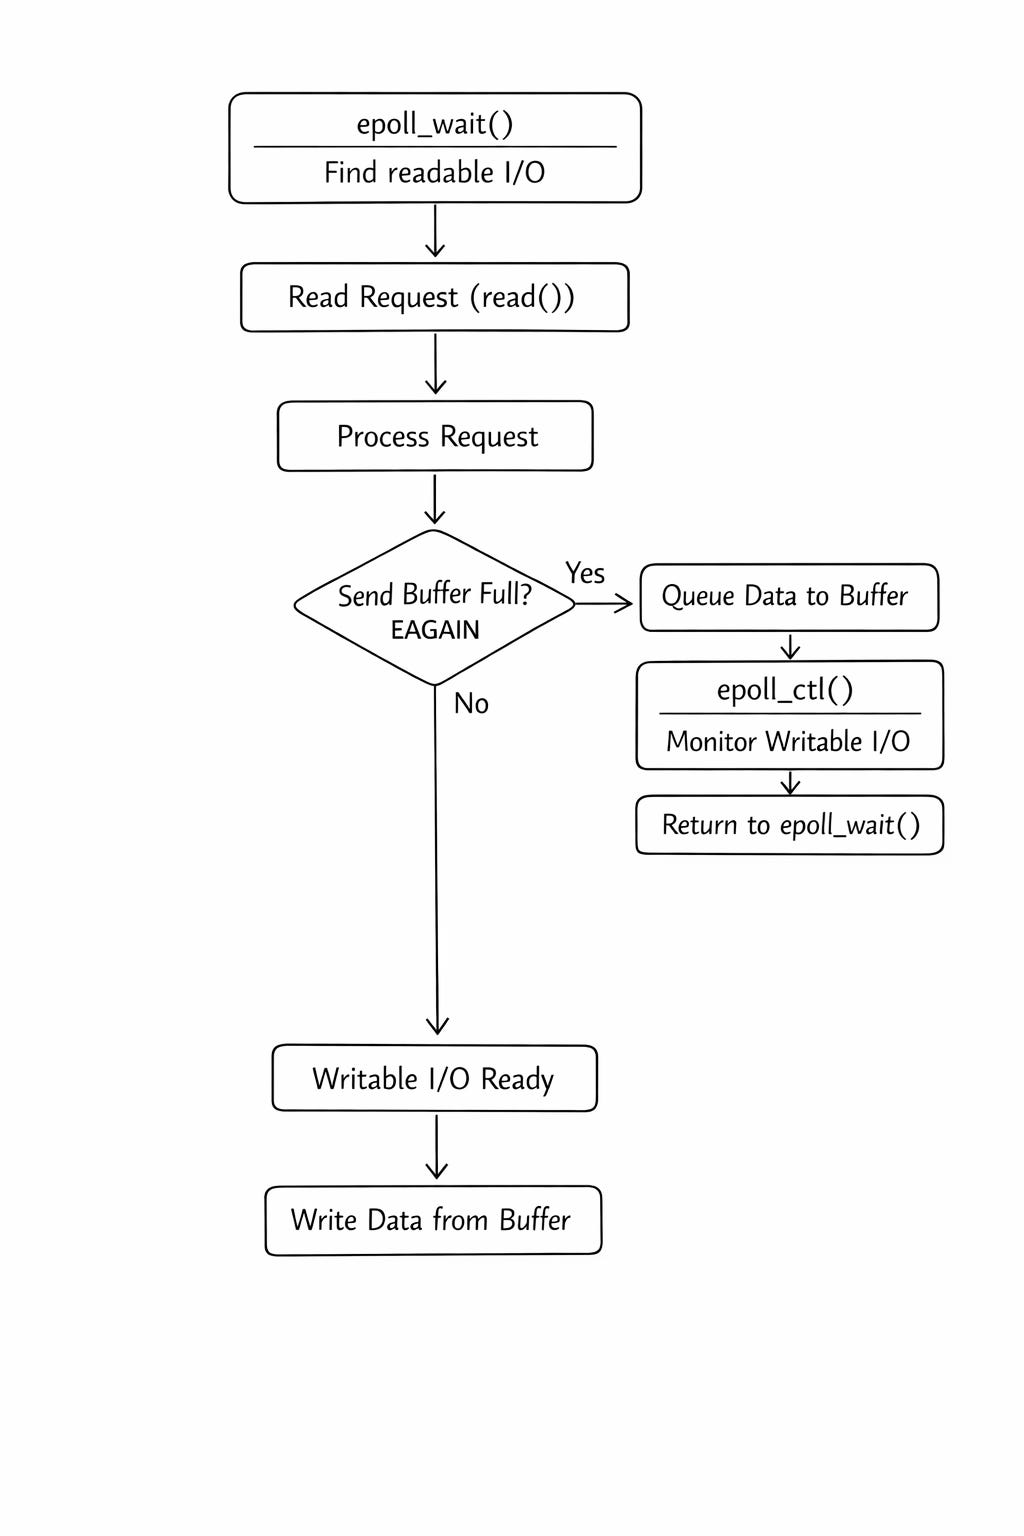
epoll loop 過程:
先透過 epoll_wait() 找到可讀 I/O,然後執行 read() 讀請求
處理完請求後,執行 write() ,若 kernel 的 send buffer 已滿,non-blocking write() 會返回 error
收到 error 後將資料先寫到 buffer queue 並執行 epoll_ctl() 監聽該 I/O 的可寫事件,然後執行下一次的 epoll_wait()
等到 send buffer 有位置,epoll_wait() 回傳可寫 I/O,在將 buffer queue 中的結果寫入,而 write() 指令會先將資料寫到 kernel 的 send buffer 中,隨後在異步寫入網卡,因此執行很快
透過上面流程,可發現 Nginx & Redis 的設計都是永遠不做會卡住的行爲 (除了 epoll_wait),只有在可讀或可寫的時候才執行 read() 或 write(),因此 CPU 使用率超高,沒有絲毫浪費,Thread 數量也很少,記憶體用量不大,這就是為什麼 Nginx & Redis 能如此高效處理瞬間大流量的秘訣!
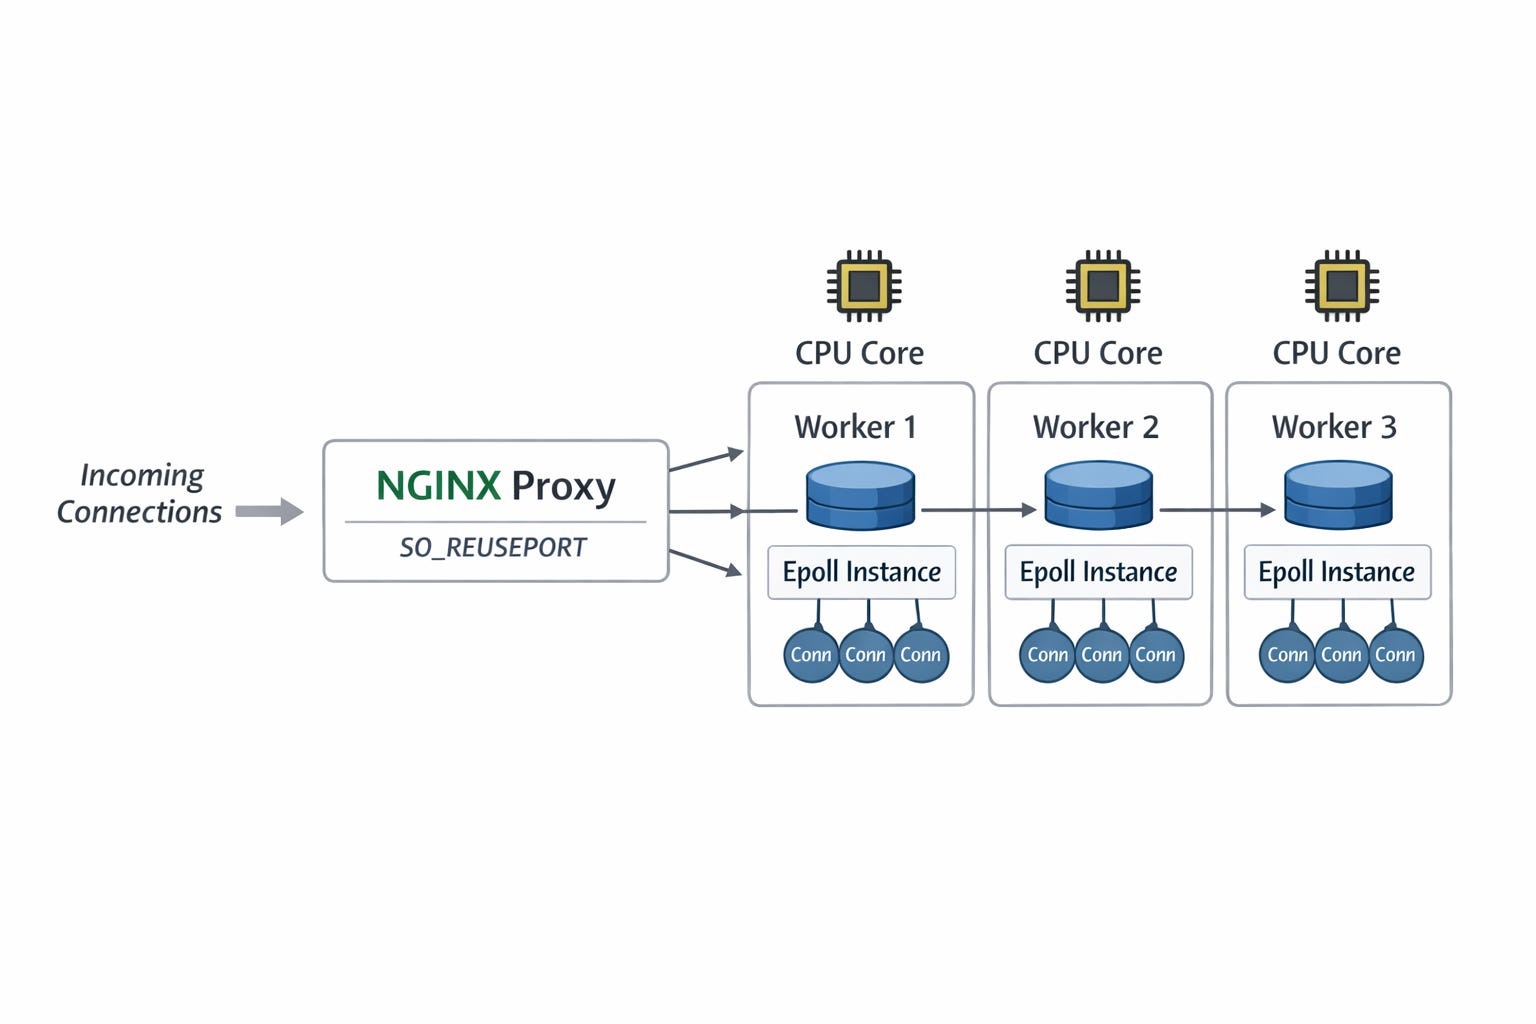
此外 Nginx 作為 proxy server 為提高請求轉發吞吐量,會透過 kernel 的 SO_REUSEPORT flag,讓不同 process 的 tcp server 監聽相同 port,kernel 會自動分配連線到不同 tcp server socket,而每一個 thread 各自用獨立的 epoll 管理不同連線,實現併發架構。
如何用 epoll 實現高效的 TCP Server,已 Rust tokio 套件為例!
常見實作 epoll loop 的 design pattern 為 reactor executor -
reactor 管理事件狀態並喚醒事件,例如 epoll_wait 監聽 TCP 連線狀態,從不可讀狀態並可讀時,process 會被喚醒從 queue 中獲得該連線。
executor 則是處理請求的核心元件,例如 redis 負責處理記憶體資料以及 nginx 處理 http protocol 解析轉發等。

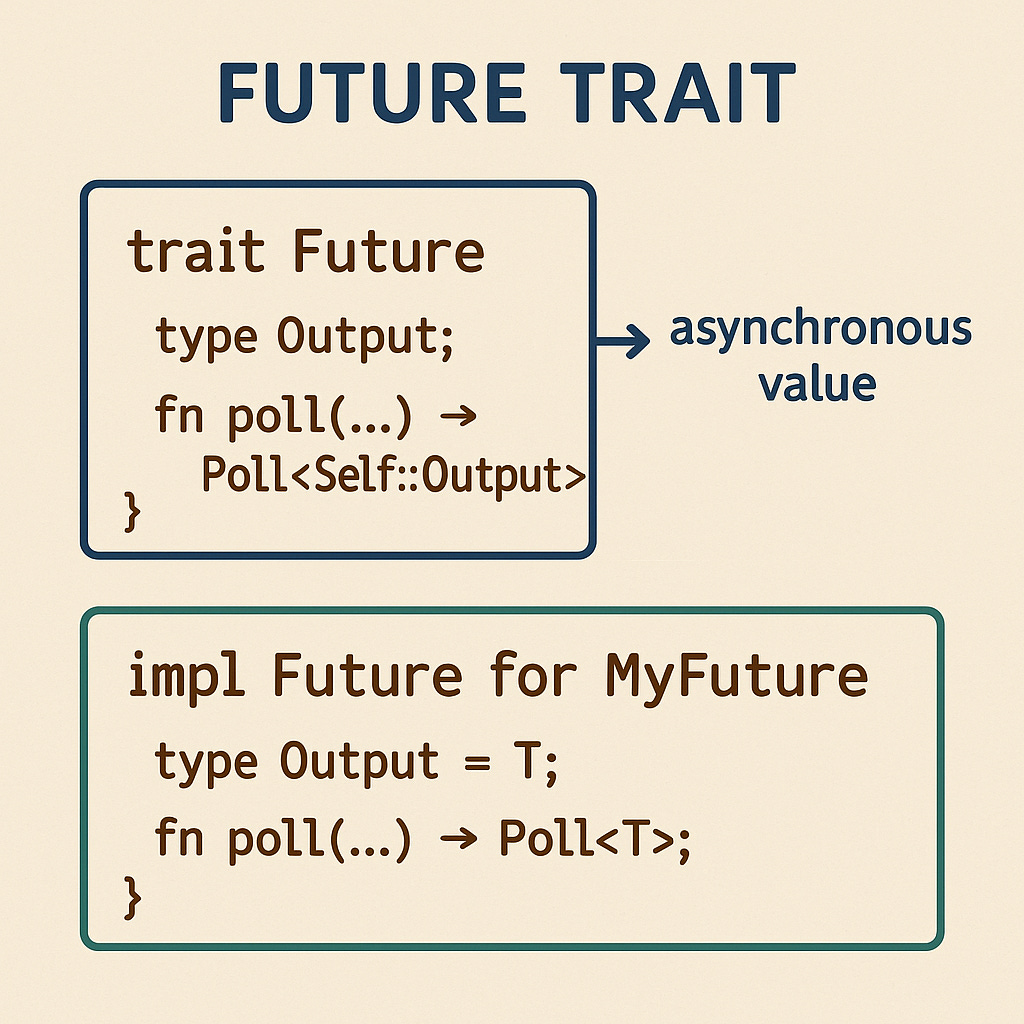
而在 Rust 生態系中,將被 reactor 元件所管理的事件狀態,抽象化成 Future trait,該介面代表 async 操作,透過執行 poll 來實際執行 Future 內部邏輯。
使用 Rust Future 開發一個簡單的 reactor 跟 executor 模式
step 1 - 實現一個 time sleep future 用來模擬請求延遲
struct SleepFuture {
    deadline: Instant,
}

impl SleepFuture {
    fn new(duration: Duration) -> Self {
        SleepFuture {
            deadline: Instant::now() + duration,
        }
    }
}

impl Future for SleepFuture {
    type Output = ();
    fn poll(self: Pin<&mut Self>, _cx: &mut Context) -> Poll<()> {
        if Instant::now() >= self.deadline {
            Poll::Ready(())
        } else {
            Poll::Pending
        }
    }
}

async fn send_request() -> i32 {
    SleepFuture::new(Duration::from_secs(2)).await;
    1 + 1
}

fn process_added_value(val: i32) {
    println!("處理加法結果: {}", val);
}
step 2 - 實現 reactor-executor pattern,reactor 負責 trigger Ready 狀態的 future 將結果透過 queue 送給 executor 處理,executor 初始化一個 thread 處理 queue 中的資料。
type BoxFuture = Pin<Box<dyn Future<Output = i32> + Send>>;

fn reactor(futures: Vec<BoxFuture>, tx: mpsc::Sender<i32>) {
    let waker = Waker::noop();
    let mut cx = Context::from_waker(&waker);

    let mut tasks: Vec<Option<BoxFuture>> = futures.into_iter().map(Some).collect();
    let total = tasks.len();
    let mut done_count = 0;

    loop {
        for task in tasks.iter_mut() {
            if let Some(fut) = task {
                if let Poll::Ready(val) = fut.as_mut().poll(&mut cx) {
                    tx.send(val).unwrap(); // Ready!丟給 executor
                    *task = None;
                    done_count += 1;
                }
            }
        }

        if done_count >= total {
            break;
        }

        thread::sleep(Duration::from_millis(100));
    }
}

fn executor(rx: mpsc::Receiver<i32>, total: usize) -> thread::JoinHandle<()> {
    thread::spawn(move || {
        let mut done = 0;
        while done < total {
            let val = rx.recv().unwrap();
            process_added_value(val);
            done += 1;
        }
        println!("executor: 全部處理完成");
    })
}
step 3 - 完成 main function 執行
fn main() {
    let (tx, rx) = mpsc::channel();
    let futures: Vec<BoxFuture> = vec![Box::pin(send_request()), Box::pin(send_request())];

    let total = futures.len();
    let handle = executor(rx, total);

    let start = Instant::now();
    reactor(futures, tx);
    handle.join().unwrap();
    println!("全部完成,耗時: {:?}", start.elapsed());
}
上述代碼展示了 Future trait 的抽象化能力,可把所有操作封裝成 async 行為,自行定義狀態轉換時機,搭配不同底層的 event loop 機制,可在不修改核心業務程式條件下,替換不同的 reactor-executor 的實作。
Tokio 的 epoll 架構
而 tokio 作為 rust 中知名的 async runtime,其底層是用 epoll 來實現 reactor-executor,我們來看一下最簡單的 TCP echo server:
use tokio::net::TcpListener;
use tokio::io::{AsyncReadExt, AsyncWriteExt};

#[tokio::main]
async fn main() -> Result<(), Box<dyn std::error::Error>> {
    let listener = TcpListener::bind("127.0.0.1:8080").await?;

    loop {
        let (mut socket, _) = listener.accept().await?;

        tokio::spawn(async move {
            let mut buf = [0; 1024];

            // In a loop, read data from the socket and write the data back.
            loop {
                let n = match socket.read(&mut buf).await {
                    // socket closed
                    Ok(0) => return,
                    Ok(n) => n,
                    Err(e) => {
                        eprintln!("failed to read from socket; err = {:?}", e);
                        return;
                    }
                };

                // Write the data back
                if let Err(e) = socket.write_all(&buf[0..n]).await {
                    eprintln!("failed to write to socket; err = {:?}", e);
                    return;
                }
            }
        });
    }
}#[tokio::main]這個 macro 會初始化一個 runtime object,block_on 就是等所有 future 事件都處理完,而主要的 future 物件是一個 tcp server 處理新連線,因此 TCP server 沒關閉 runtime object 不會結束:
 #[tokio::main] 展開後,實際上是:
  fn main() {
      let runtime = tokio::runtime::Runtime::new().unwrap();
      //  內部做了:
      //  1. epoll_create()     → 建立 epoll 實例
      //  2. 建立 thread pool   → worker threads
      //  3. 建立 timer wheel   → 管理 sleep/timeout

      runtime.block_on(async {
          let listener = TcpListener::bind("127.0.0.1:8080").await.unwrap();
          // ...
      });
      // block_on 啟動 reactor 的 event loop
  }
Tokio 如何把連線放入 Epoll 中?
tokio::net::TcpListener 跟 tokio::io::{AsyncReadExt, AsyncWriteExt} 有別於 std 套件中的 socket 物件,實作了 epoll 版本的 Future,例如下面示意 code :
impl Future for TcpReadFuture {
    type Output = Vec<u8>;

    fn poll(mut self: Pin<&mut Self>, cx: &mut Context) -> Poll<Vec<u8>> {
        match non_blocking_read(self.fd, &mut self.buf) {
            Ok(data) => Poll::Ready(data), // 有資料,直接回傳
            Err(WouldBlock) => {
                if !self.registered {
                    reactor.register(self.fd, Interest::READ, cx.waker().clone());
                    self.registered = true;
                }
                Poll::Pending
            }
        }
    }
}
讀到資料就回傳 OK,沒讀到透過 epoll_ctl 放到 epoll 結構中,並回傳 pending,而執行 await (e.g socket.read(&mut buf).await) 時,編譯器會產生 :
loop {
    match future.poll(cx) {
        Poll::Ready(val) => break val,
        Poll::Pending => {
            return Poll::Pending;
        }
    }
}
執行 poll 時會將該 future 中的 connection 放入 epoll 中。
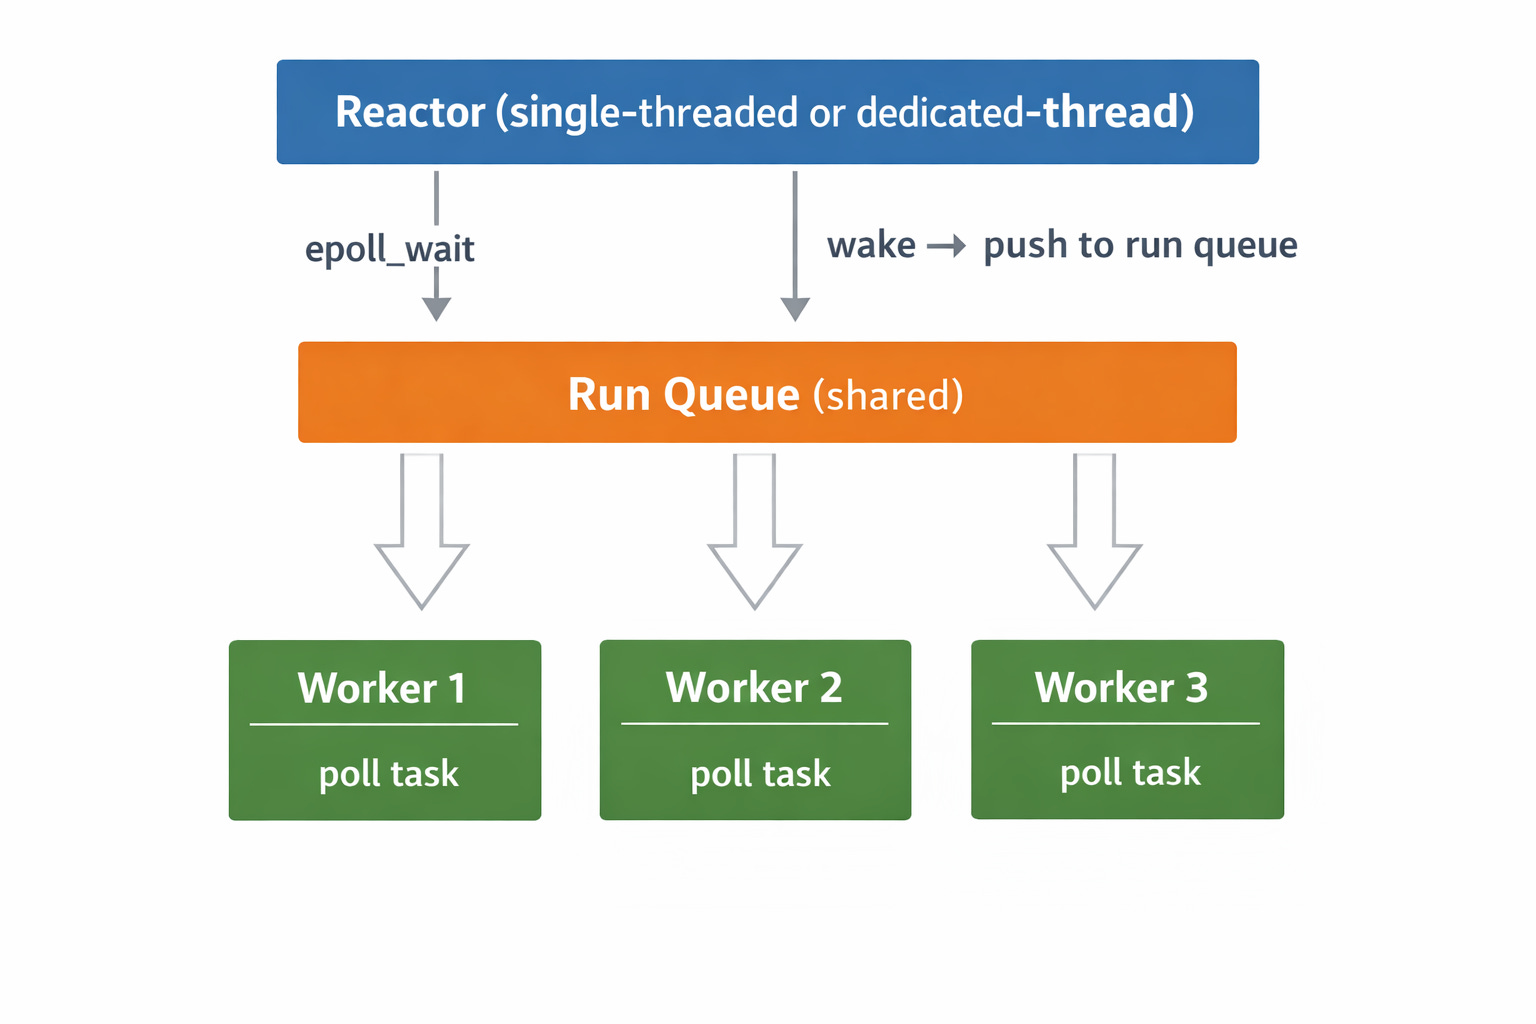
最後 tokio 的 reactor 模組會執行 epoll_wait 找到可讀連線,放入 queue 中交由不同 worker thread 處理。
// reactor 示意 code
 impl Reactor {
      // Reactor 獨立運作,只負責喚醒
      fn run(&mut self) {
          loop {
              let timeout = self.nearest_timer_deadline();
              let ready_fds = epoll_wait(self.epoll_fd, timeout);

              for (fd, token) in ready_fds {
                  self.run_queue.push(token.task_id);  // 丟進共享 queue
              }
          }
      }
  }
Tokio 的 worker thread 如何產生?
當 TCP server 收到一個連線後執行的 tokio::spawn(async move {...}),該 spawn 並不會初始化 kernel thread,而是將這個 async future 物件放進 worker queue,交由不同 kernel thread (executor) 執行。
每個 kernel thread 會從 queue 中獲取 future task 並執行 poll ,概念 code 如下:
# Conceptual code example
fn worker_thread(run_queue: Arc<SharedQueue>, tasks: Arc<TaskMap>) {
    loop {
        let task_id = run_queue.pop(); // Blocks if queue is empty
        let task = tasks.get(task_id);
        match task.poll(&mut cx) {
            Poll::Ready(()) => { tasks.remove(task_id); }
            Poll::Pending   => { /* Waker is registered, wait for next wake-up */ }
        }
    }
}
而 worker thread 會在建立 runtime 的時候指定 thread 數量:
#[tokio::main(flavor = "multi_thread", worker_threads = 4)]
async fn main() {
    // your async code
}
Nested Future Task
上面 TCP Echo server 中,worker thread 處理的每個 task 是執行 connection read & write 的 nested future 結構:
spawn Future(ReadLoopFuture)
└── socket.read().await(TcpReadFuture)
└── non_blocking_read() → WouldBlock → register epoll
└── socket.write().await(TcpWriteFuture)
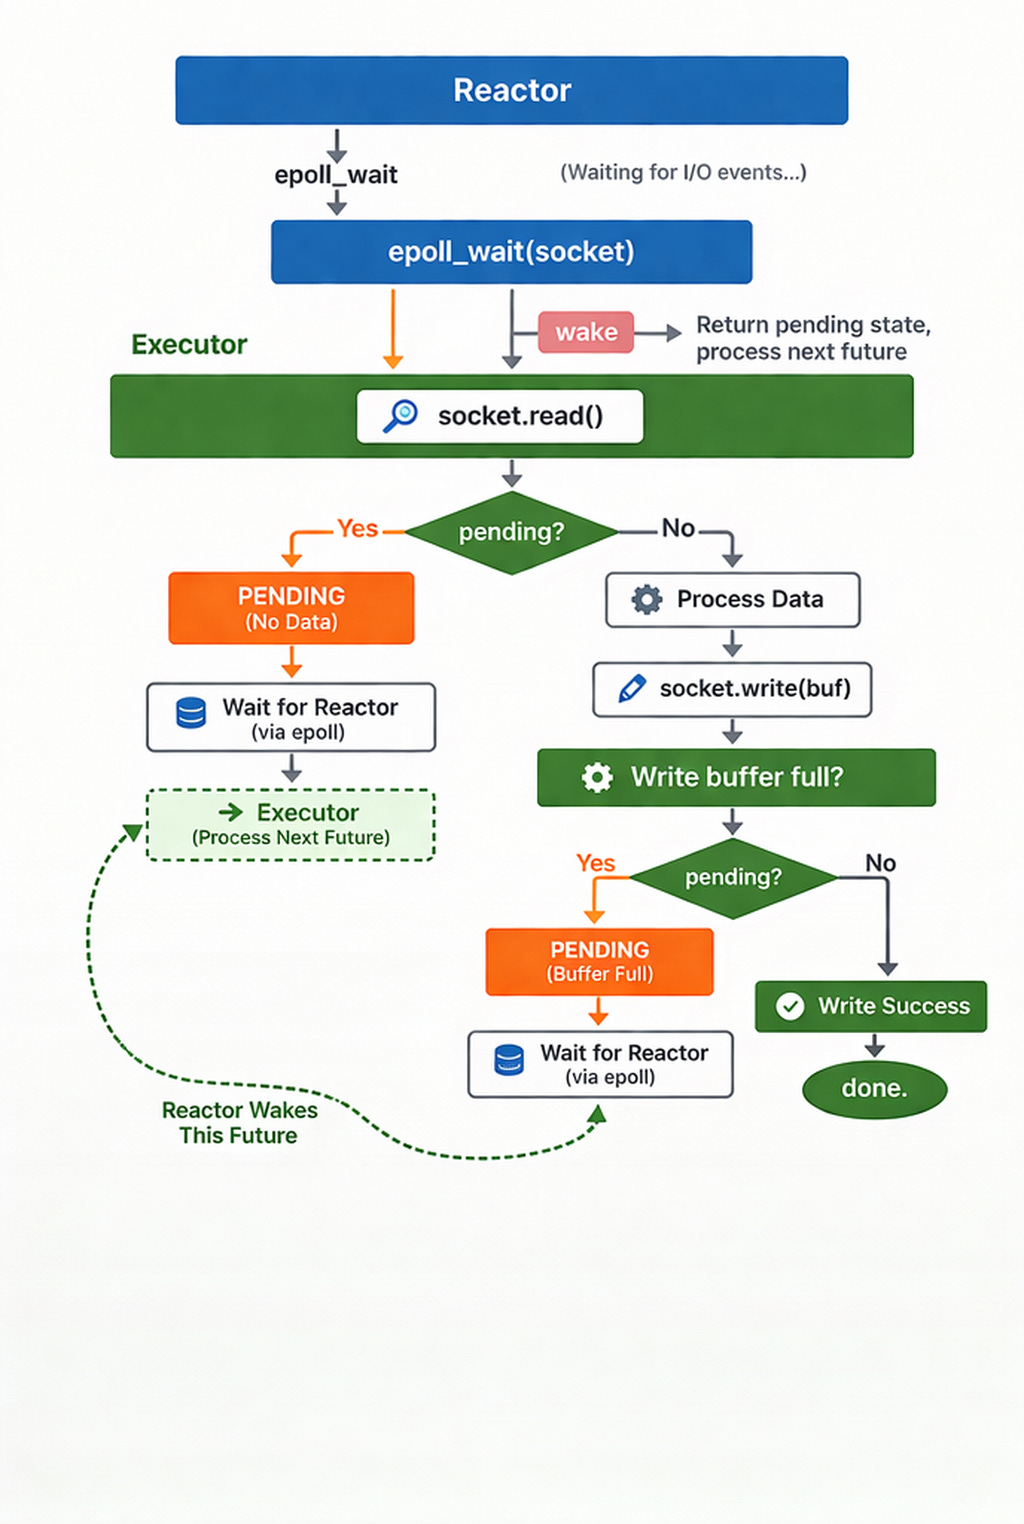
└── non_blocking_write() → WouldBlock → register epoll socket read 若沒資料,會放到 epoll 等 reactor 通知,此時 executor 收到 socket.read() return 的 pending 狀態後會處理下一個連線的 future,等 reactor 喚醒該 future 後往下處理進行 write,同樣若 write buffer 滿了會回 pending 等 reactor 再次喚醒才寫入成功。
最終整個 tokio runtime 架構為:
下集預告
雖然 epoll 提供是大部分高效 server 的底層技術首選,但隨著 kernel 演進,全新的 async I/O 處理技術也隨著出現,也就是 io_uring,且 rust tokio 也有用 io_uring 實現 async runtime,下一集會介紹 epoll 的效能問題,以及 io_uring 如何解決!